
Friday 29 March 2013
Sunday 24 March 2013
Inside NXT Brick. Replacing broken USB port.
A student of Lego Robotics class accidentally broke the USB port of NXT brick, thus I had to replace it.

Removing the battery revealed four bolts that I had to remove in order to open the top of the brick. After removing the top, you'll see two more bolts, which hold the display and the whole brick together.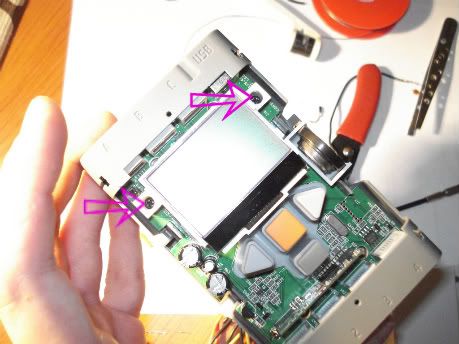
I thought that removing all the bolts will allow me to disassemble it completely but after a little picking I realized that the board was actually soldered to the battery holder. After unsoldering the two pins I was able to see the other side of the board. There were three main components that will catch your eye immediatelly :
I had no time to inspect all of the components, because I had to replace the broken port. Unsoldering the old port was exhausting.
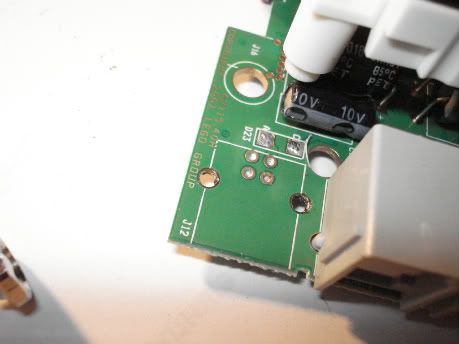
Placing the new one was easy and it cаme up pretty well.
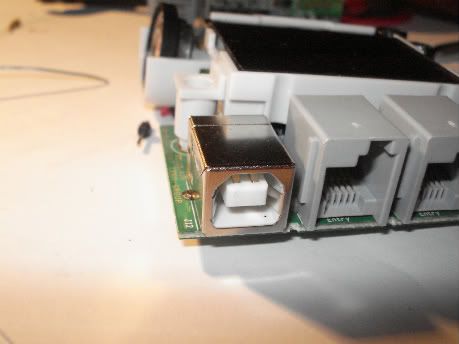
It was time to put everything together. I don't know why but resoldering the right pin of the battery took me ages. When you put it together do not forget to place the black rubber button between the board and battery holder - you need it if you have rechargable li-ion battery. Before screwing back the last four bolts check if you have connection with your PC.
For full information and schematics download this
Removing the battery revealed four bolts that I had to remove in order to open the top of the brick. After removing the top, you'll see two more bolts, which hold the display and the whole brick together.
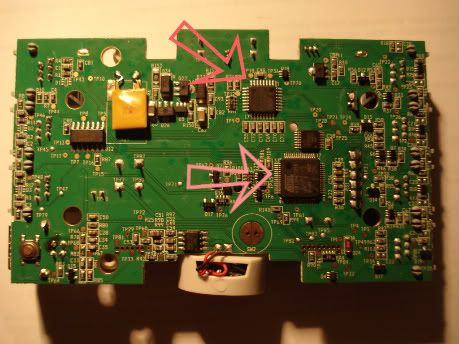
I thought that removing all the bolts will allow me to disassemble it completely but after a little picking I realized that the board was actually soldered to the battery holder. After unsoldering the two pins I was able to see the other side of the board. There were three main components that will catch your eye immediatelly :
- the Bluetooth module at the top of the board next to the display
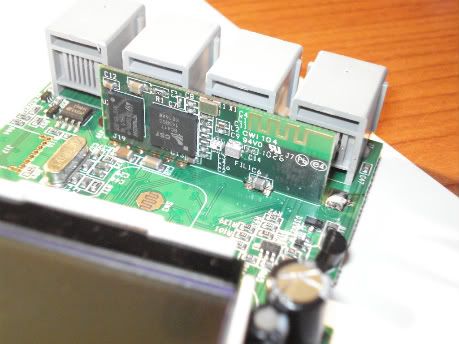
- the Atmel 32-bit ARM main processor (AT91SAM7S256)
- and the tiny ATmega48 co-processor
I had no time to inspect all of the components, because I had to replace the broken port. Unsoldering the old port was exhausting.
Placing the new one was easy and it cаme up pretty well.
It was time to put everything together. I don't know why but resoldering the right pin of the battery took me ages. When you put it together do not forget to place the black rubber button between the board and battery holder - you need it if you have rechargable li-ion battery. Before screwing back the last four bolts check if you have connection with your PC.
For full information and schematics download this
Wednesday 8 February 2012
Amazing FESTO bio-inspired robots
AIRACUDA
AQUA_RAY & AIR_RAY
AQUAJELLY & AIRJELLY
SmartBird
Thursday 12 May 2011
Fez Mini first start -> first firmware upgrade
Last week I received my Fez Mini and yesterday I decided to play with it a little bit. I wanted to move a servo motor. The Wiki in tinyclr.com has already a servo driver so I decided to go with it (http://www.tinyclr.com/downloads/Component/FEZ_Components_ServoMotor.cs)
It is a pretty simple peace of code but I had a problem deploying it on the board - no error while compiling or deploying, but it stays in "Rebooting..." for a while and then exits the program. Firstly, I thought that my wiring was wrong but after checking it several times nothing seems to be misplaced. In .NET Micro Framework folder in Program Files there is a helpful tool MFDeploy that you can use to diagnose your board. Starting "Reboot and Stop" command resulted in many errors explaining that the assemblies version of GHI NETMF I am trying to use differs from the version board expected.
Here is the thing you need to do if you have the same problem:
- Go to http://tinyclr.com/dl/ and read the BIG RED warning :"Update your firmware.
This is a common mistake made by first time users. If you don't update your device's firmware your program will fail to deploy." - Download the newest version of GHI NETMF SDK and install it.
- One picture is worth a million words .. what about a video. This 8 minute video will show you the right way to update your firmware which is pretty easy: http://youtu.be/a3N0nQRWb08. You can apply this method not only to Fez Mini but with other FEZ boards.
The beggining: Moving from Wordpress to Blogger
Just moving my content from hexabot.wordpress.com to this page. After making some research I found out that Blogger is more suitable for my needs and provide more features I reqiure.
This blog is going to be my attempt to encourage myself to proceed with my robotic projects as well as providing interesting information from the geeky robotics world. :)
Subscribe to:
Posts (Atom)